VertiGIS Studio Web - Create New Feature tool
Hi there!
With the retirement of Esri's JavaScript 3.x API we are working on getting our Essentials applications migrated to VertiGIS Studio Web. There is a very basic tool in the Essentials toolbar that we use all the time for our editing tasks and that's the Create New Feature tool:
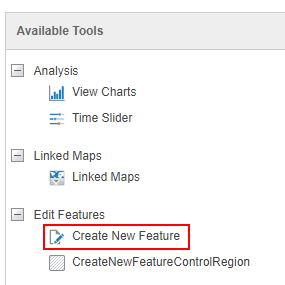
It simply opens up the editable feature services and their editing templates from the service and shows the symbology for each item. Very simple and very useful for 95% of our editing tasks.
I've been digging around within VertiGIS Studio Web to find this functionality and I'm not really seeing anything quite like it.
There is the Add feature tool but that appears to be only linked to layer actions OR you can config the tool to only target what appears to be a single layer at a time. I'm hoping I'm just missing something and that's why I'm posting this.
We were hoping to avoid custom workflows for such a simple task but is that the only option? If so, is there a sample workflow out there that mimics the Essentials Create Feature tool? I saw there was a sample workflow for adding a single feature for hydrants on the sample site but I'm looking for users to have that same experience of picking from templates of all editable layers in the map. Just like 95% of Esri editing tools out there and what our users are used to.
Thanks for any help!
-

yes I agree. I often need to quickly launch editable layers that have a category in the form of a domain / list . The user needs to be able to click the category and then create a feature. ESRI apps has this and it makes a lot of sense for probably 90% of my editing requirements.
2 -

Agree, we are facing the same issue. Following this topic. We also asked our local supplier/support.
Looks like this is a missing functionality within VertiGIS Studio Web. I expected this to be standard/out-of-thebox functionality. I'm afraid we will have to make another custom workflow (WF5) for this simple task.1 -

See this idea and the comment of Cam Barnard
https://support.vertigis.com/hc/en-us/community/posts/11497852112146/comments/11497858524562
1 -

That's too bad but good to know - thanks for sharing Nico Burgerhart!
I can totally get some of those use cases outlined in the linked comment being a bit much for an out-of-the-box tool (or something like the Web App Builder's Smart Editor that some users got used to). I was just at least hoping for feature parity (or very close to) with the out-of-the-box Create New Feature tool in Essentials as we make our move to VSW.
Sounds like we will need to turn to another Workflow; just more work.
Thanks again!
1 -

Hey Andrew & everyone on this thread
You're correct in observing that our current OOTB method for feature creation in VSW requires accessing the layer for its "Add Feature" operation, or configuring an "Add Feature" command that uses the edit.create-feature that targets the specific layer first. However, the pattern you've described merits further investigation as we'd of course like to cover as much functionality OOTB as reasonably possible. This sounds like a great general use case that could be addressed as part of the product.
Let me clarify to ensure I understand your suggestion: You're proposing an out-of-the-box tool within VSW's resources, named "Create New Feature". This tool, when initiated, would compile a list of all feature services available in the current web map, displaying them alongside their respective symbology. Users could then select a specific feature layer, and be shown a creation interface detailing all relevant attributes, possibly including a picker for location. Is that an accurate representation of your idea?
2 -
Hi @... thanks for reaching out!
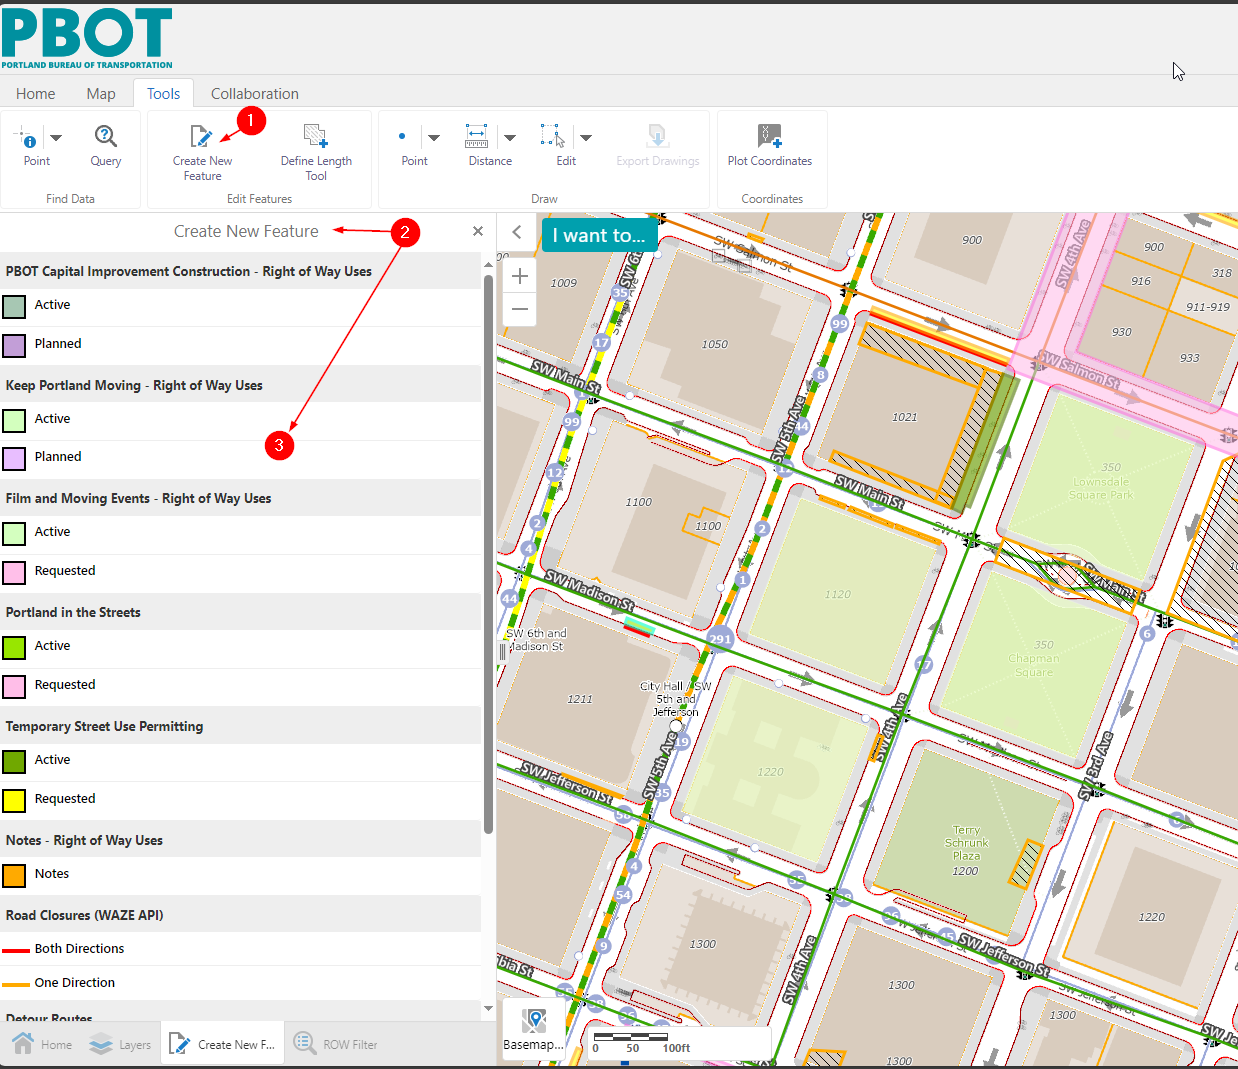
Yes, that sounds like an accurate representation of the idea.This is what the current OOTB Essentials tool does. The user clicks the tool up on the toolbar (1) and the tool opens (2) and the users are presented with editable layers (with symbology) within the tool (3):
then the users selects one of the layer templates in the tool (4) and they are prompted to create some geometry (5) and they draw the geometry and double click to end (6):

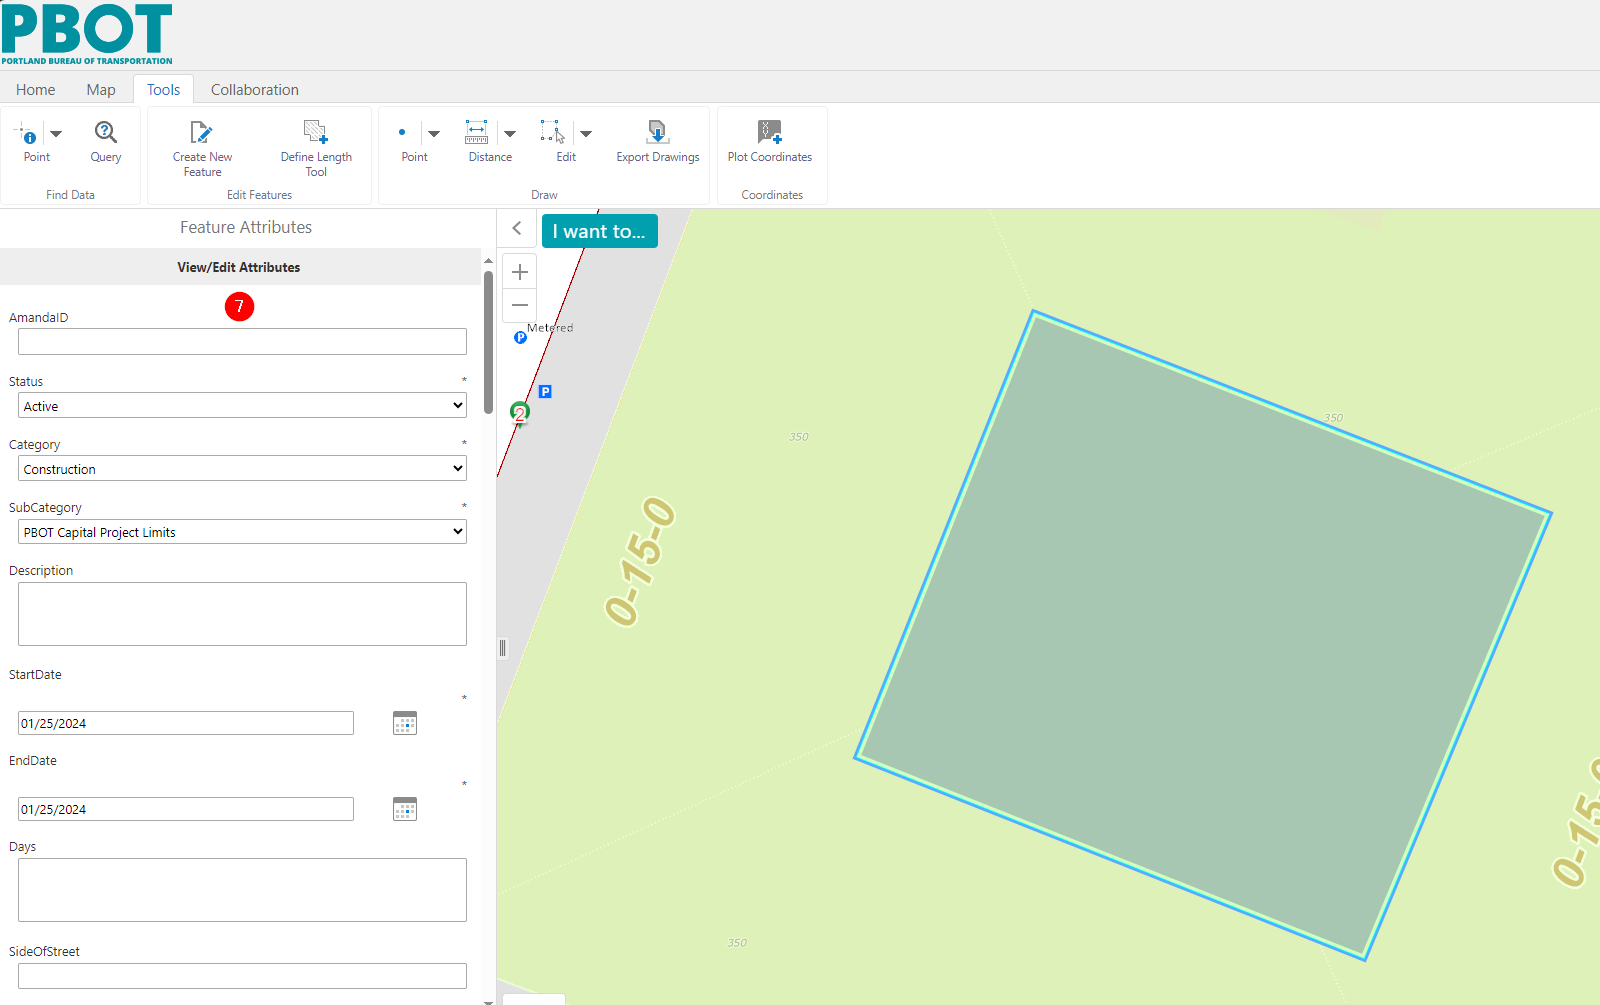
then they are presented with the attributes (and default values) all controlled from the service template (7):
and if they scroll down through all the attributes (8) they click save (9) and it commits the edits.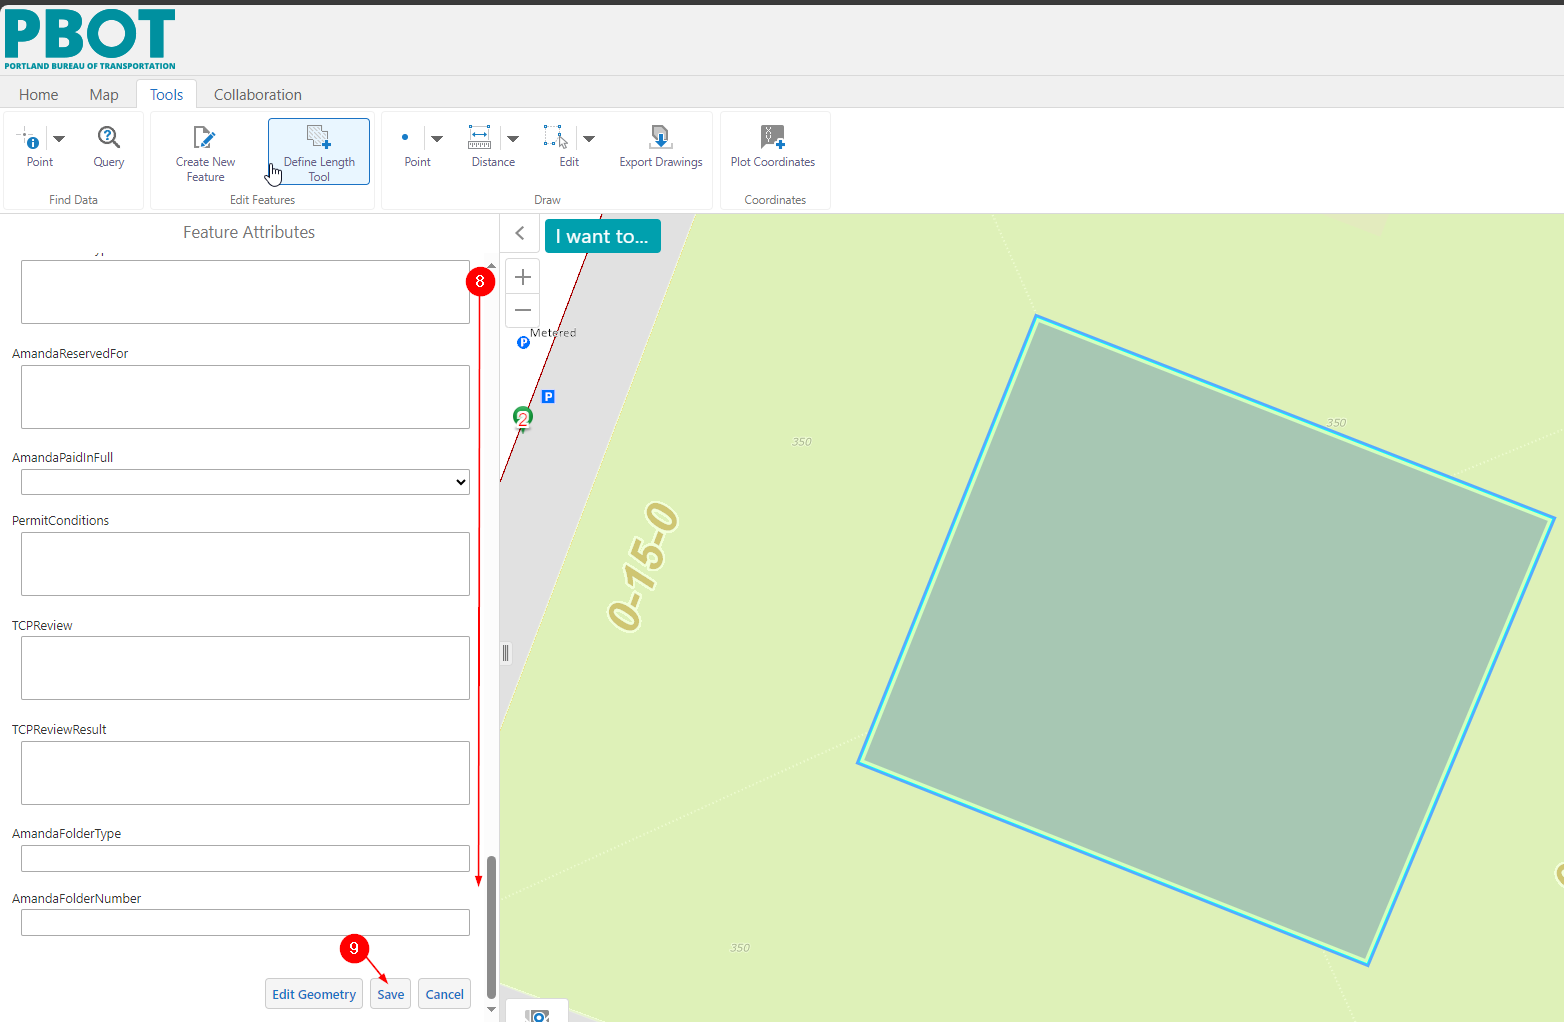 That should do it!
Let me know if you have any other questions. Again, thank you for reaching out!2 -

Hi all! I'm a collegue of Ingmar, and we created a Workflow that does the trick for us (although an OOTB workflow would still be preferable).
Here are some tips that we found along the way:
First step for the user is to pick the layer that they want to edit. We offer a list of editable layers in a display form. The list is created with the following statement, this gets all feature layers where the current user has editing privileges (the $map refers to the output of a Get Map-activity):
=$map.map.map.layers.items.slice().reverse().filter((layer) => { return layer.type === "feature" && layer.userHasEditingPrivileges})After the user has picked an editable layer, we wanted to rely on the OOTB 'add feature'-functionality, using the command 'edit.display-add-feature', so that we don't have to define a template on the fly. The input Command Parameter looks like this (can't get this part in a code block somehow):
{
"orientation": "vertical",
"showTitles": true,
"formUITarget": {
"parent": "panel-810b0210",
"attributes": {
"slot": "panel"
}
},
"templateUITarget": {
"parent": "panel-810b0210",
"attributes": {
"slot": "panel"
}
},
"layers": "item://layer-extension/" + $chosenLayerRefID.result}
In these arguments there are two parts that should be changed for your application:
- Both occurances of panel-810b0210 should be replaced with the ID of a panel in your viewer, where you want the edits to take place. In our case, we used the ID of the panel where the Workflow itself runs, so that there's a smooth transition for the user from our workflow to the 'add-feature'-functionality.
- The $chosenLayerRefID.result is a parameter that is based on the layer picked by the user, in the first display form. This one was very tricky, because it is an ID of a layer-extension. There is no easy way to get this ID based on a layer ID, but I managed to get it working with help of support. You need these two steps:
- Run the following Operation: app.create-project
- Create a new value based on the output of this operation, with the following code. The layerID.result should reference the layer ID of the layer chosen by the user:
=$runOperationCreateProject.result.items.find(x => x.$type == "layer-extension" && x.layer.$ref.id == $layerID.result).id
That's how we got it working for us :) Hope it helps someone.
Cheers, Yannick
4 -

Would it be possible to get a copy of this workflow? I've been unsuccessful creating from the listed steps.
2
Bitte melden Sie sich an, um einen Kommentar zu hinterlassen.
Kommentare
8 Kommentare